Sync Your Folders: Getting Started with Echosync
This guide walks you through your first synchronization with Echosync: creating a profile, comparing two folders and applying the changes. Copying photos to a USB drive provides the starting example. Further scenarios introduce common uses without replacing the full documentation.
Echosync works in one direction, from source to destination. In this example, you organize photos on your PC and update their copy on the USB drive. Changes made on that drive are not automatically copied back to the PC.
The illustrated walkthrough uses the graphical interface on Windows. Echocli, the command-line program, also supports synchronization on Linux.
Download Echosync
If you are new to Echosync, follow the three steps. Otherwise, jump to the scenario that matches your needs:
| Your situation | Where to start |
|---|---|
| You want a copy of your photos on an external drive | Create the first profile |
| You only want to copy new files | Add files without replacing existing copies |
| You want to propagate deletions and maintain a mirror | Choose how to handle deletions |
| You have renamed or moved folders in the source | Apply a folder reorganization |
| Some folders or files should not be copied | Exclude items with filters |
| You want to run the same synchronization regularly | Automate with Echocli |
1. Create a profile for the USB drive
Section titled “1. Create a profile for the USB drive”Install Echosync or extract its portable version to a writable folder, then open the application. Connect the USB drive and prepare a destination folder dedicated to this copy.
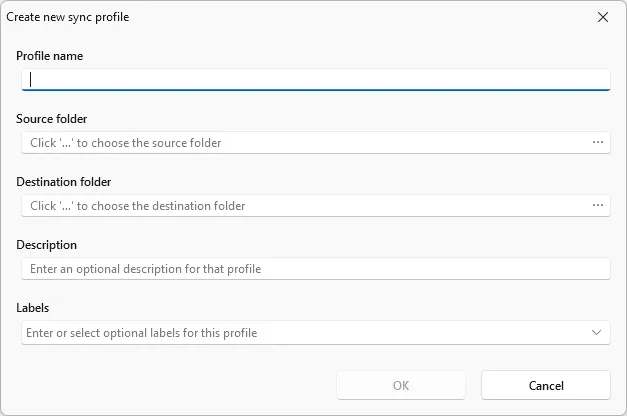
A profile remembers the two folders and the actions to perform. Replace the following example paths with your own:
| Field | Example | Purpose |
|---|---|---|
| Profile name | Photos USB | Identify this synchronization |
| Source folder | C:\Photos |
Photos you manage on the PC |
| Destination folder | E:\Photo-Copy |
Their copy on the USB drive |
- Click New… to open the profile creation window.
- Enter the name, source and destination. Choose separate folders; do not place the destination inside the source.
- Confirm, then select the new profile in the list.
- Under Synchronization actions, check the following settings for this first example:
| Action | Setting for this example | Effect |
|---|---|---|
| Sync new items | Enabled | Copy files missing from the destination |
| Sync modified items, newer in the source | Enabled | Replace a copy with the newer file from the PC |
| Sync moved or renamed items | Enabled | Apply detected moves and renames |
| Sync deleted items | Disabled | Keep destination files that are absent from the source |
| Sync modified items, older in the source | Disabled | Do not replace a copy with an older source file |
These settings update your copy while keeping files deleted from the source. They do not create version history: copying a modified file replaces the existing destination file.
2. Compare before synchronizing
Section titled “2. Compare before synchronizing”Select only Photos USB, then click Compare. Comparison shows the changes planned for the destination without applying them.
For an empty destination, you should mainly see files to copy and folders to create. If a copy already exists, review the files to replace, move or rename. The report represents the future view of the destination folder.

Check the source and destination paths, the proposed actions and the available space. If the result does not match your intention, adjust the profile’s actions and run Compare again before continuing.
3. Synchronize and check the result
Section titled “3. Synchronize and check the result”Click Sync to apply the selected profile’s actions. You can Pause or Cancel the operation; canceling does not restore files already copied, replaced or deleted.
When it finishes:
- Check the Last sync column: a green flag means no error was reported, while a red flag indicates an error. A blue flag means no synchronization has run yet or its result could not be determined.
- If an error occurred, read the report’s Status column, then use View in the Sync log section for details.
Next time, reconnect the drive, check that it is available at the saved path, then run Compare and Sync again. Reuse the existing profile. Detection of files to update relies on modification dates; it is not a byte-by-byte verification of file contents.
Going further
Section titled “Going further”The following scenarios are independent. After changing a profile’s settings, compare the folders again to review the planned actions.
Add files without replacing existing copies
Section titled “Add files without replacing existing copies”Example: you regularly add photos to your PC and only want to copy files missing from the external drive.
- Click Duplicate… if you want to keep the first profile, then give the copy a distinct name, such as Photos - new files only.
- Enable only Sync new items. Disable replacements, deletions, moves and renames.
- Compare: a new file such as
Holidays\photo003.jpgshould be listed for copying if it is absent from the destination. - Synchronize if the proposed additions match your needs.
A photo already present in the destination will not be updated, even if you edited it on the PC.
Propagate deletions and maintain a mirror
Section titled “Propagate deletions and maintain a mirror”Example: you deleted blurry-photo.jpg on the PC and also want to remove it from the USB copy.
- Enable Sync deleted items in the relevant profile.
- Click Compare and review the items to delete. This includes files present only in the destination.
- Synchronize only if those deletions are intended.
To also reflect an older version restored in the source, enable Sync modified items, older in the source. With all five actions enabled, synchronization aims to reproduce the source in the destination within the scope defined by your filters.
Apply a folder reorganization
Section titled “Apply a folder reorganization”Example: in the source, you rename the Holidays folder to Holidays 2026 without changing its photos.
- Enable Sync moved or renamed items.
- Run Compare for the profile.
- Review the detected moves or renames, then synchronize to apply them to the destination.
When a move or rename is recognized, Echosync avoids deleting and copying the same files again. Reorganize files in the source: changes made in the destination do not flow back to the source.
Exclude temporary files or a folder
Section titled “Exclude temporary files or a folder”Example: your source folder contains a Temp subfolder and .tmp files you do not want to copy.
In the source folder filters, keep the general inclusion and add these exclusions:
**/*!**/Temp/!**/*.tmp**/*includes files at every folder level.!**/Temp/excludes folders namedTempand their contents. The final/identifies a folder.!**/*.tmpexcludes files whose names end in.tmp.
Run Compare again to check the resulting scope, especially if the destination already contains files and synchronization of deletions is enabled. Exclusion takes priority over inclusion. Filters are case-insensitive on Windows and case-sensitive on Linux.
The filter documentation explains the other available patterns.
Automate synchronization with Echocli
Section titled “Automate synchronization with Echocli”Example: you want to run Photos USB regularly without opening the graphical interface.
First check the profile with Echocli, using the same installation and account as Echosync. In these PowerShell examples, replace the executable path with your own:
& "C:\Tools\Echosync\Echocli.exe" list "Photos USB"& "C:\Tools\Echosync\Echocli.exe" compare "Photos USB"The first command displays the profile; the second shows the planned changes. After reviewing them, this command applies synchronization:
& "C:\Tools\Echosync\Echocli.exe" sync "Photos USB"You can then run that last command through Windows Task Scheduler. For an action that starts a program, separate the executable from its arguments:
| Field | Example to adapt |
|---|---|
| Program/script | C:\Tools\Echosync\Echocli.exe |
| Arguments | sync "Photos USB" |
| Start in | C:\Tools\Echosync |
Choose the schedule, run the task manually once and check the log. The drive must be connected at the scheduled time, and the account running the task must have access to the folders and profile. Echosync does not include its own scheduler.
If Echocli cannot find the profile, check its location: installed profiles belong to the user account, while portable profiles are in the application’s Profiles subfolder.
The command-line documentation explains profile selection and labels.
If some files do not synchronize
Section titled “If some files do not synchronize”Start with the message in the Status column or the log. Check drive availability, access permissions and free space. On Windows, copying locked files with VSS requires administrator privileges.
If unchanged files are proposed for copying again, compare their modification dates: differences in timestamp precision between file systems may explain this behavior. For an overview, see the software presentation.